What is Tkinter? Python GUI Development Guide for Beginners
Introduction
So far, you have explored What is Python and how to install it on Windows. The programs you have written up to this point likely run inside the terminal — the user types input and receives text output. However, most everyday desktop applications feature windows, buttons, and input forms: a Graphical User Interface (GUI).
Tkinter is the fastest and most accessible way to build desktop GUI applications with Python. In this guide, you will learn core Tkinter concepts, explore widgets and layout managers, handle user events, and build a complete, real-world temperature converter application.
What is Tkinter?
Tkinter is Python's standard built-in library for creating graphical user interfaces. Its name is derived from combining "Tk" (a mature, cross-platform graphics toolkit) and "interface".
Because Tkinter comes bundled directly with standard Python distributions on Windows and macOS, there is no need for external package installation. This zero-setup nature makes it the top recommendation for developers learning desktop development in Python.
Advantages of Tkinter:
- Built-in: Included in standard Python distributions with zero external dependencies.
- Beginner-Friendly: Easy to learn and intuitive to prototype with.
- Cross-Platform: Works seamlessly across Windows, macOS, and Linux.
- Great for Tools: Ideal for internal desktop utilities, personal automation scripts, and small-to-medium tools.
Limitations:
- Default system widgets look traditional unless styled with
ttkor modern wrapper libraries likecustomtkinter. - Not designed for complex mobile interfaces or high-performance graphics engines.
Verifying Tkinter on Your Machine
To verify that Tkinter is available in your Python environment, run this command in your terminal:
python -m tkinter
If a small test window appears, Tkinter is ready for development. Close the test window to proceed.
Creating Your First Window
Every Tkinter application begins with a top-level root window. Create a new file named app.py and write the following code:
import tkinter as tk

window = tk.Tk()
window.title("My First GUI App")
window.geometry("300x200")

window.mainloop()
Run the application:
python app.py
A clean 300x200 pixel desktop window will appear:
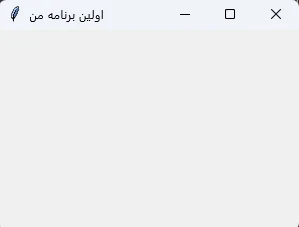
Breakdown of the Code:
import tkinter as tk: Imports Tkinter using the standard community aliastk.tk.Tk(): Instantiates the root application window.title(): Sets the text displayed on the window title bar.geometry("300x200"): Defines the initial window width and height in pixels.mainloop(): Starts the event listener loop. It listens for user interactions (clicks, keyboard input, resizing). Withoutmainloop(), the window will either not render or exit immediately.
Essential Tkinter Widgets
Visual elements placed inside a window are called Widgets. Here are the most essential widgets:
1. Label
Displays static text or images:
label = tk.Label(window, text="Hello, this is a Label")
label.pack()
2. Button
A clickable button executing a Python function when clicked:
button = tk.Button(window, text="Click Me")
button.pack()
3. Entry
A single-line text input field:
entry = tk.Entry(window)
entry.pack()
4. Frame
An invisible container used to group and organize related widgets:
frame = tk.Frame(window)
frame.pack()
5. Text
A multi-line text area suitable for notes or logs:
text = tk.Text(window, height=5, width=30)
text.pack()
Geometry Managers in Tkinter
Creating a widget is only the first step; you must position it on the screen using a geometry manager:
1. pack()
Places widgets sequentially in blocks (top to bottom or left to right). Best for simple, single-column layouts.
2. grid()
Arranges widgets in a 2D table grid defined by row and column coordinates. This is the recommended geometry manager for forms and input panels.
tk.Label(window, text="Name:").grid(row=0, column=0)
tk.Entry(window).grid(row=0, column=1)
3. place()
Positions widgets using absolute pixel coordinates (x and y). Flexible, but fragile when windows resize.
Important Rule: Never mix
pack()andgrid()inside the same parent container; it will cause geometry layout deadlocks. Use separateFramecontainers if you need both.
Handling User Events with Buttons
Pass a callback function reference to the command parameter to execute logic when a button is clicked:
import tkinter as tk

def handle_click():
    label.config(text="Button was clicked!")

window = tk.Tk()
window.title("Button Event Demo")

label = tk.Label(window, text="Waiting for click...")
label.pack(pady=10)

button = tk.Button(window, text="Click Me", command=handle_click)
button.pack(pady=10)

window.mainloop()
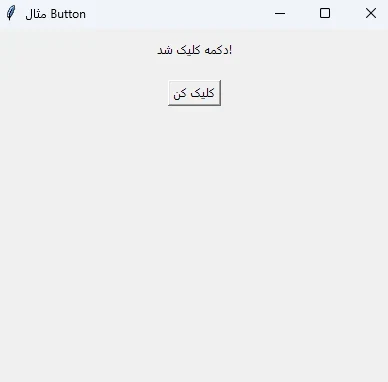
Pro Tip: Pass
command=handle_clickwithout parentheses. Writinghandle_click()will execute the function immediately upon launch rather than waiting for user click.
Building a Real Project: Temperature Converter
Let's build a functional GUI tool that converts Celsius temperatures to Fahrenheit with user validation and clean error handling:
import tkinter as tk
from tkinter import messagebox

def convert_temperature():
    try:
        celsius = float(entry_celsius.get())
        fahrenheit = (celsius * 9/5) + 32
        label_result.config(
            text=f"Result: {fahrenheit:.1f} °F",
            fg="#16a34a"
        )
    except ValueError:
        messagebox.showerror(
            "Input Error",
            "Please enter a valid numeric temperature."
        )

window = tk.Tk()
window.title("Temperature Converter")
window.geometry("340x220")
window.resizable(False, False)

frame = tk.Frame(window, padx=20, pady=20)
frame.pack()

tk.Label(
    frame,
    text="Celsius to Fahrenheit Converter",
    font=("Helvetica", 12, "bold")
).grid(row=0, column=0, columnspan=2, pady=(0, 15))

tk.Label(frame, text="Temperature (°C):").grid(row=1, column=0, sticky="e", pady=5)
entry_celsius = tk.Entry(frame, width=15)
entry_celsius.grid(row=1, column=1, pady=5)

tk.Button(
    frame,
    text="Convert",
    command=convert_temperature,
    bg="#2563eb",
    fg="white",
    padx=10
).grid(row=2, column=0, columnspan=2, pady=10)

label_result = tk.Label(frame, text="", font=("Helvetica", 11, "bold"))
label_result.grid(row=3, column=0, columnspan=2)

window.mainloop()
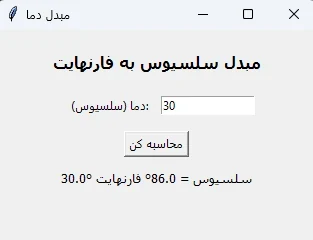
Conclusion & Next Steps
You have mastered the foundational building blocks of desktop GUI programming in Python: creating windows, laying out widgets with grid(), reading user input with entry.get(), and handling errors gracefully.
In our next project tutorial, level up your GUI engineering skills by building a Graphical Calculator in Python and Tkinter.
Tags for this article:
Related Articles

Building a Graphical Calculator with Python and Tkinter
Complete step-by-step tutorial on building a desktop GUI calculator with Python and Tkinter; covering window layout, dynamic buttons, evaluation logic, and robust error handling.
How to Install Python on Windows (2026 Complete Guide)
Step-by-step guide to installing Python on Windows in 2026 using both the CLI (winget) and the official installer, configuring PATH, and running your first program.

What is Python? Uses, Advantages, and Learning Path
Python is a high-level, open-source, general-purpose programming language. Learn why it has become the world's most popular language, what it is used for, and how to get started.